
RGB MATRIX INTEGRATION IN TO ARCADE MACHINE EMULATOR CABINET
SOFTWARE IMPLEMENTATION (RGB WEB SERVER)

LED MATRIX WEB SERVER SETUP
MICRO SD CARD PREPARATION
• Insert 16GB SD Card in to SD Card reader (Attached to windows PC)

USING WINDOWS DISK MANAGER
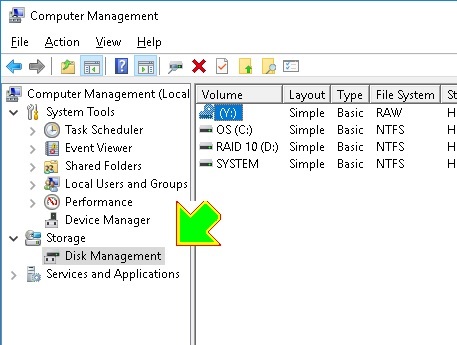
• REMOVE ALL PARTITIONS from SD card *
• Create one new partition spanning ALL SPACE of SIM Card (DO NOT FORMAT)
DOWNLOAD A COPY OF GUI FORMAT
http://www.ridgecrop.demon.co.uk/index.htm?guiformat.htm
• Using GUIFORMAT, Format the SD CARD
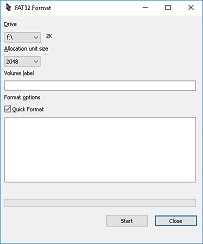
IMAGING SD CARD
• Download and install a copy of “Win32 Disk Imager”
https://sourceforge.net/projects/win32diskimager/
• Download and extract a base copy of Base Raspian
https://www.raspberrypi.org/downloads/raspbian/
USING “Win32 Disk Imager”
EXTRACT a copy of Raspian on to SD
CARD
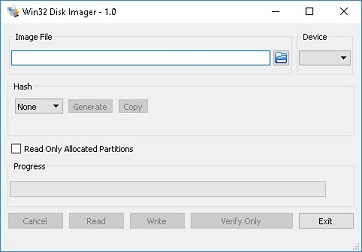
• Insert in to Raspberry Pi and boot
• Once initial setup is complete JOIN YOUR LOCAL WIFI NETWORK
• Access the Raspberry Pi Configuration menu and ensure SSH is “ON”
• Drop to a terminal Window and enable SSH Access
Type: sudo raspi-config
Select: INTERFACING OPTIONS
Select: SSH
TAB OVER TO FINISH and hit ENTER
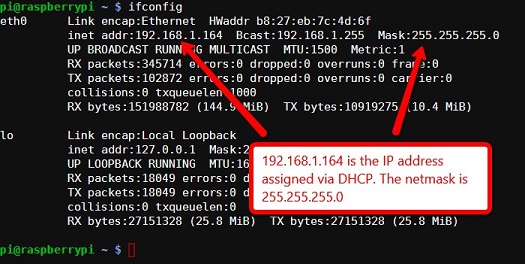
DETERMINE YOUR IP ADDRESS:
TYPE: "ifconfig"
INSTALLING RGB WEB SERVER
METHOD ONE (FROM TERMINAL WINDOW)
TYPE FOLLOWING COMMANDS
git clone https://github.com/csantill/LEDMatrixServer
cd LEDMatrixServer
pip install -r requirements.txt
git pull
** START WEBSERVER BY EXECUTING FOLLOWING
COMMANDS **
cd LEDMatrixServer/
sudo python rpi-server.py
METHOD TWO (FROM AN SSH
TERMINAL WINDOW)
Download and install a copy of Putty (OR other preferred SSH Terminal software)
Create Entry for access to RGB WEB SERVER
Ensure you are creating an SSH Connection on Port 22 using the "PREVIOUSLY DETERMINED IP ADDRESS" of your Web Server
SAVE the entry for later use

CONNECT TO RGB SERVER USING PUTTY
login:
“pi”
Password
“raspberry”
HINT: WHILE USING PUTTY YOU CAN COPY TEXT IN WINDOWS AND THEN RIGHT CLICK INSIDE OF PUTTY FOR PASTE
TYPE (or COPY/PASTE) FOLLOWING COMMANDS
git clone https://github.com/csantill/LEDMatrixServer
cd LEDMatrixServer
pip install -r requirements.txt
git pull
** START WEBSERVER BY EXECUTING FOLLOWING
COMMANDS **
cd LEDMatrixServer/
sudo python rpi-server.py
SETTING UP AS AN AUTOSTART SERVICE
Once you are satisfied, RGB Matrix WEB Server is working properly and have
performed all your tests to satisfaction you may set it up as an Auto executable
service
FROM TERMINAL WINDOW (OR SSH WINDOW) type following commands
cd LEDMatrixServer
git pull
There should now be a new file startLEDServer.sh run the following command
crontab -e
You may be prompted to select the editor to use, make sure you choose nano (the
other editors will be incredible difficult to use).
Go to the end of the file and add the following line
@reboot sh /home/pi/LEDMatrixServer/startLEDServer.sh
SAVE THE FILE
<ctrl> - o (letter o followed by enter)
exit nano
<ctrl>-x
REBOOT RASPBERRY
SETTING UP HOSTNAME ACCESS ON RGB SERVER
IMPORTANT: if you plan on referencing the Server by SMB HOSTNAME on client side these additional steps must be taken
From Command prompt (Or SSH)
sudo apt-get update
sudo apt-get -y install samba
sudo raspi-config
(option 2) Network options
(Option N1) Hostname
(READ NOTE) select "OK"
type new Host name (ALL CAPITALS)
i.e. RGBSERV1
select "OK"
tab over to: SELECT (enter)
arrow over to: FINISH (enter)
at rebot now window select "YES" (Hit enter)
REBOOT RASPBERRY

